background & pinterest, facebook script

Wednesday, March 27, 2013

Reusablly Cute Snack Bags

Sandwich bags
The idea of making some cute snack bags just sounded good to me. I have been washing some ziplock bags to reuse one more time. Not all of them. Just the ones that had silly things in them like carrots or raisins and crackers. Dry snacks and leftovers that are not meat. My kids know to hand me empty bags and I like to keep one in my purse, which comes in handy!

I have been looking for the time to make these and searching for the right tutorial. I had a way in mind that I wanted to make reusable snack bags… but alas I did not find a tutorial that made sense to me or that made the bags quite the way I wanted. So here is another tutorial to add to the Internet.

While making these I have hopes of saving some bags from landfills. And also saving money on all those bags that inevitably get tossed into the garbage. Did you know that recycling centers will not take ziplocks? What?!


The first one I made was ok, but I figured it out and made the others look Good. After the first couple, the others took about 10 minutes each. Really fast.

To make the bags I used a cotton outside with a washable nylon lining and a 2 inch Velcro strip.

First thing was to measure the ziplock bags in order to sew them to the same size.
Sandwich bags are 7 x 8 inches so I cut pieces to 8 x 10 inches to accommodate a Velcro closure.
Snack bags are 5 x 8 inches so I cut pieces to 8 x 8 inches to accommodate the Velcro closure. Note: all the pictures that I took are of the sandwich bag size the snack bags are half the size.

I first sewed the inside lining. The seam will be on the outside when you sew them together.
Then I sewed the cotton outer fabric inside out so the seam is sandwiched inside (get it?). 

Putting the pieces together I started with the shorter side. It looks a little confusing, but since I wanted both seams hidden, I actually had to (initially) put the pieces together and fold the edges down then hold them together to figure out the position needed to sew. But it isn't difficult and very worth it!


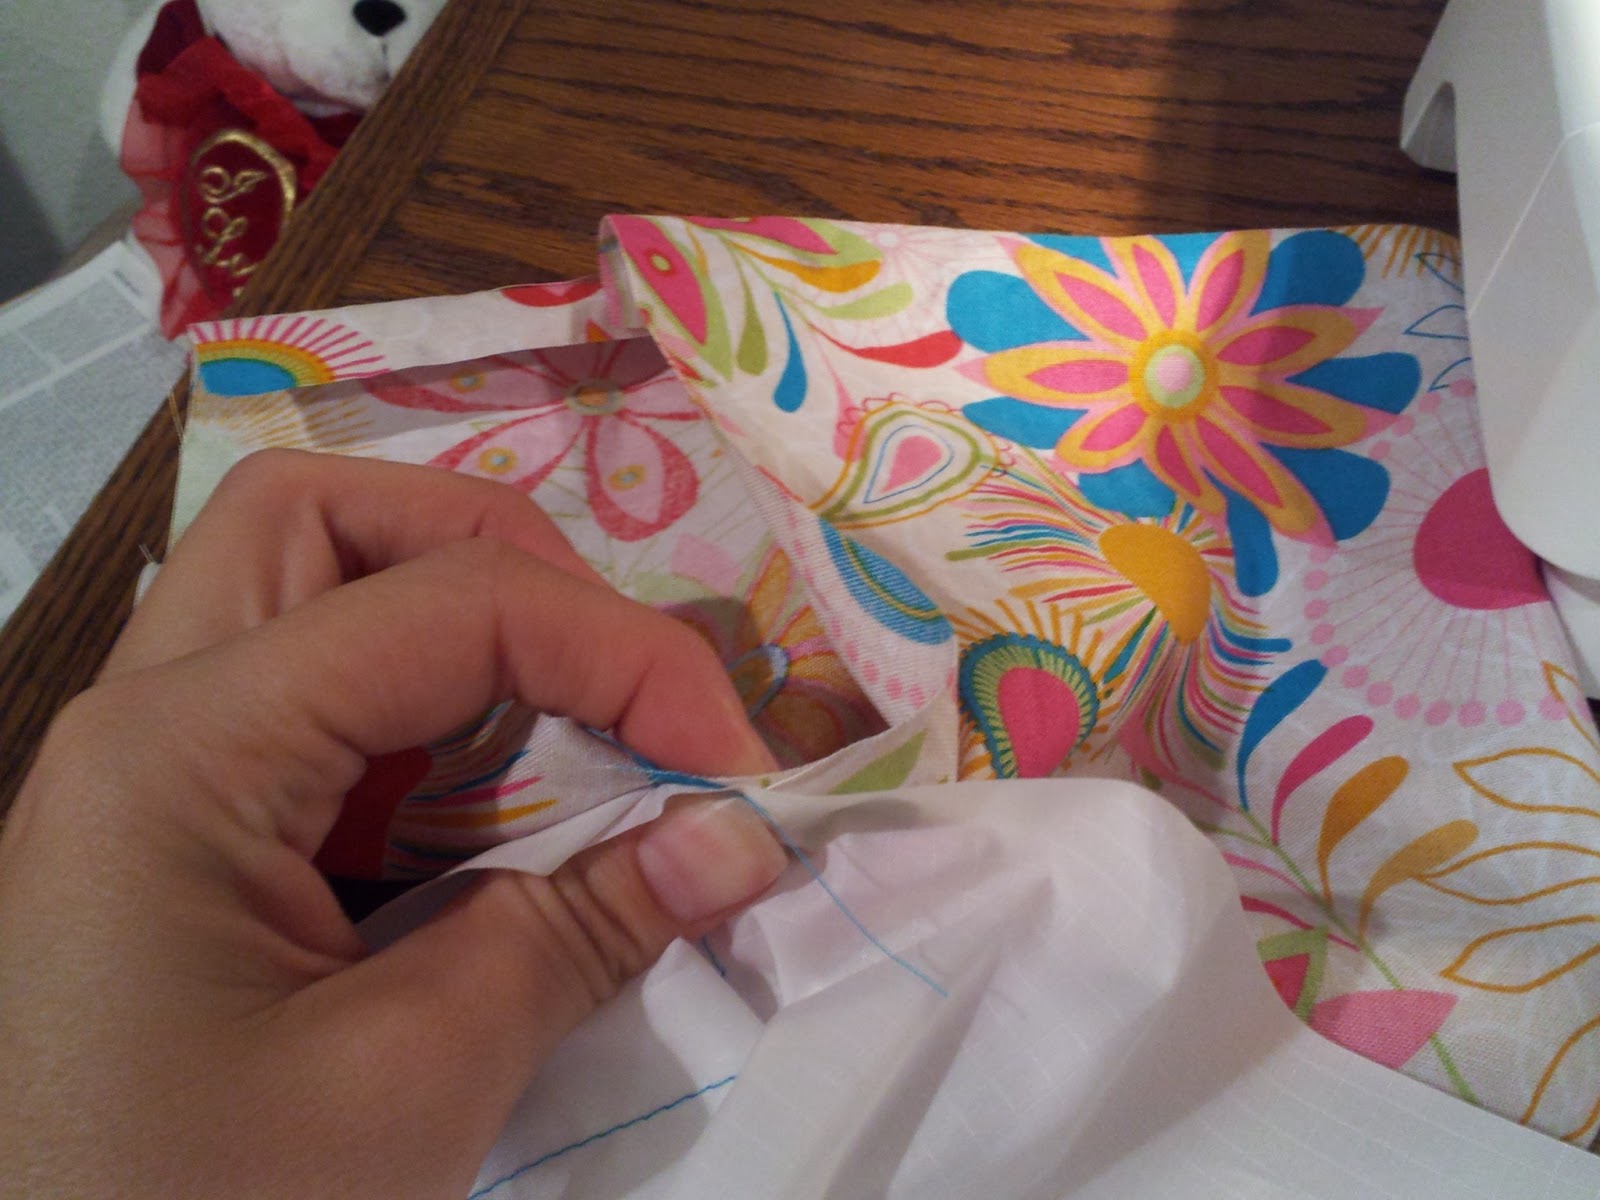
Then the large side, which will be the closure. I sewed the sides first.


I used a pin to keep the pieces together before finishing it off.


Last is velcro. Sew the top and bottom pieces.


Ta Da!


I made a few other fabric options as well. Like super hero and space ones for my son. I am actually thinking of making a bunch more for gifts or even to sell on etsy. I just need more hours in the day!

Overall, I am very pleased with these bags. To wash them I turn them inside out and stick them in a lingerie bag so the Velcro doesn't stick to my clothes or towels. Easy as can be!

Sunday, March 3, 2013

BBQ Sauce: Easy & Yummy

It has been a while since I put up a recipe and since I was thinking last night about various things I needed to do, BBQ Sauce came up. I thought it was funny when my cousin yelled, "No Way! I can make BBQ Sauce?!" when I mentioned it. So rather than making the peanut butter that we really need (because it's a pain in the butt and I am a procrastinator at heart), I decided to replenish my empty BBQ sauce.

I have to say that I LOVE BBQ Sauce!

My husband teases me that I need a spout in my kitchen just for dolling out the BBQ sauce. That probably isn't a good thing. Especially when the labels look like this:


Notice that in both bottles of BBQ Sauce, High Fructose Corn Syrup is the first ingredient listed. They each contain similar ingredients. One thing I did not add to my sauce is Liquid Smoke flavor since I personally do not like the taste of smoked anything. It is amazing the varied ingredients that can go into this sauce. Every recipe is different - which is why experimenting is so FUN Necessary.

Luckily, the ingredients of the items I have in my kitchen to make this sauce Do Not contain the High Fructose Corn Syrup, soy or color. (Although I did discover an unopened container of mustard with some of the dreaded ingredients... darn the holidays! Hickory Farms is sneaky. I thought they were gourmet.)

I have only made BBQ sauce a couple times, and I haven't exactly made the same recipe twice because I keep tweaking it to see what the result is. I prefer a tasty spicy, sweet sauce. This time it came out a little on the spicier side. But it is good. My husband says that the homemade stuff smells and tastes like something that you get at a restaurant. That means: Mission Accomplished.

Now about the recipe that I put together. I have been changing it a little each time. It is the combination of a recipe from Rachel Ray, allrecipe.com, and food.com. Which means that it doesn't resemble any recipe, I just looked at the ingredients that other people have used and stuck the ingredients that I wanted to use into one recipe. I don't think that this is the absolutely best recipe it can be, but it doesn't suck.

BBQ Sauce

·         2 Cups organic Ketchup
·         2 tablespoons Dijon mustard
·         2 tablespoons Maple syrup (Can cut syrup and add more honey)
·         ¼ Cup Molasses 
·         ½ Cup Apple Cider Vinegar
·         ¼ Cup Worcestershire Sauce
·         ¼ Cup Honey
·         1 shot of Bourbon (I didn't have bourbon on hand this go round. I used 1shot/2T of Cognac instead. Which is just another alcohol that we don't drink.)
·         1 tablespoons Garlic powder
·         Juice of 1/2 large Orange or Lemon (I used an orange)
·         2 tablespoons Chili powder (My homemade version)
·         1 tablespoons Onion powder
·         1 teaspoon Pepper
·         dash of Salt
·          2 tablespoons Tamarind Paste (I did not have this. But supposedly it is really worth adding! I have it on my next Amazon order list.)

1) Mix thoroughly 
2) Simmer over medium heat for 15 minutes with the lid off to thicken it a bit.
3) Taste and adjust. It may taste a bit vinegary at first, but that is less obvious when you use it. You can store it into clean bottles in the refrigerator for a month or two.

This recipe made two bottles of sauce.

Enjoy!
I would love to hear any suggestions how you make BBQ Sauce. How did you tweak the recipe?

Shared at: Cheerios & Lattes, Mop it up, Make it Pretty, Shine on Friday,

Sunday, February 17, 2013

New Years Resolution to Vacation

A couple years ago, my husband and I realized that the vacations we want to go on NEVER happened because we didn't plan for them. This would not do! I know that memories are made every day, but have you ever noticed that the memories you cherish the most are the special times you did something unique? Especially for kids. So we made a resolution to plan our year for each New Year. This has worked out really well since we started three years ago.

It is really very simple. On New Year’s Day we investigate costs associated for the trips we want to take that year and then we put it on our calendar. By knowing when and how much things costs, we are able to come up with a budget and a savings plan so we have the funds to go. It is also helpful to know your plans so that you can keep a lookout for any deals.

Our first year, we were able to save for a one week Anniversary cruise for my husband and I to Mexico. This was our first time away from them so just juggling where they would be was an experience. We also made a three day trip to Disneyland around my daughter's birthday and a couple camping trips with the kids. 

Last year, we went camping a couple times. We went to Tahoe to ski for a week and a day at Disneyland. We also planned for a trip to Colorado and Arizona, but the trip to Colorado for Thanksgiving was canceled since Colorado family members there were all sick with the flu. We did make it to AZ to visit my husband's family and see his grandmother for her 95th birthday.
 This year, we are really excited to make it to Colorado this summer. My husband and I went to Tahoe without the kids for 3 days for business and fun time together. We are also planning a train ride to San Diego to take the kids to see the sites and visit Sea World. We were also considering a trip to Hawaii without the kids, but have decided that we need to hit our business goals. (Besides, we hit our goals and the company will send my whole family for free next year.)

Next year we would like to go to Australia!

How about you? Do you make the resolution to vacation?

Shared at: Mop it Up, and Cheerios & Lattes

Thursday, January 10, 2013

Game Bag for the little gameiac

Happy 2013! I have so many posts stored up in my head that I have been itching to write. But at the same time I am coming off of the holiday high, as it were, enjoying my quiet-kids-asleep-time doing things like sitting on my rear reading a good book or fanfiction, cleaning or playing with my new camera. My sister recently recruited me for a writing project and since I've been writing and editing... I decided that it is long past time to start writing those posts I've told you about.

So for the first post of the New Year, I wanted to share the game bag with you that I made for my little man.

My 5 year old has been into every game he can get his hands on! Really! I don't know any other 5 year old who can win at Solitaire. Go Fish. Crazy 8s. War. All the age-appropriate board games out there and recently started mastering checkers.

Knowing that, when I saw the game bag at I Can Teach My Child, I knew I had to make one too! I  did modify it from the original idea though, of course. I chose to make a checker board on one side and a tic-tac-toe on the other side. I was also thinking that in a year or so when he is interested in tackling chess, I can add some pieces from an old game in the bag too. Here is what I did:

I bought at pillow case from the Goodwill store for $1.99. And then I decided that the best way to make my game boards was from ribbon, so I had to buy that too. Then I got to gluing, which made sewing the pieces much easier.


The Checker board was a little complicated. I was hoping that I could weave the ribbon in and out of the fabric, but it proved to be not as simple. I settled for weaving every even row and gluing squares for the odd rows. Before I started slicing with my Xacto knife I put my quilting cutting board in the pillow case and used the ruler shown to measure out each row.


The tic-tac-toe side was a quickie. I cut the ribbon, placed it where I wanted and glued.


Once each of these boards were completed and the glue dry, I was able to easily sew the ribbons on. I also cut the top of the pillow case off (it was a king size) so it wouldn't be so large and I have extra material for another project! I bought a yard of cord for $1 and sewed a seam and button hole for a closure.

On to the pieces! For the tic-tac-toe X and O I decided to use some foam pages that I had in my art supply. I printed out the X and O as a template and used a cutting board to slice them up. It took me about an hour to get this done... but in all fairness I was watching tv at the same time so it would have been a lot quicker if I had ruled out multitasking.


For the checker board pieces. I bought wood circles at the craft store and used a sample of red paint (that I already had) and black spray paint (that I also already had).

As you can see, I made good use of my Black Friday ads by painting on them.


When the paint was dry. I used a metalic sharpe that I had on had to draw crowns on the pieces. Just like the real thing!

So the end result was a game bag with pieces!


 Hope you enjoyed reading! Have you made anything recently that sprung from a good idea?

Shared at: Shine on Friday, Show and Tell, I should be mopping the floor,

Tuesday, November 13, 2012

Holiday Preparedness 2012

I am very close to being completely done with Chanukah/Christmas shopping. Hallelujah!

I have yet to really go through what I think I have and what I bought that I don't remember buying. It is all under my my bed, stuffed into the closet and there are even a couple things in the garage. I started buying a few things here and there back in March, but I have been filling in the major gifts in the last two months bargain shopping. There are a couple things that I do need to buy last minute, like new pillows (how do you hide those?!) and I also have some items to make on my to-do list.

Luckily I do know what I need/want to make and buy thanks to my handy spreadsheet.

To keep myself accountable, I thought I would share my homemade gift to-do list.

For my daughter:
- Play apron and potholders. I have already started cutting the fabric for these and I am really excited for her to play with her own potholders rather than mine. It is very inconvenient to have to search them down to take something out of the oven...
- Mirror. I have this really cute iron mirror that I got on freecycle that I can just envision as a fuschia pink in her room. I have not been able to find the right color spray paint, so I am on a mission to find the color at the craft store this week.
- Bed Skirt. This is the same bed skirt I set out to make in May for her bed and still have not started. I would like to finish this to give as a gift, but I will be happy if I finish by valentines day.

For my son:
- Game Bag. He is really into games right now. Any card game or board game is, um, game. I found a great idea at Teach my Child. Where the outside of a bag is a tic-tac-toe board and the inside holds the pieces. I am taking that concept and using a pillowcase to save time and making a game board on both sides: tic-tac-toe and checkers! I got all my pieces and I have to do some spray painting and sewing, but this should be a quick project once I have the time and energy to finish it.

Other gifts: (not started yet... lots to do!)
Teachers: I plan on giving a book (for the class) with a chocolate dipped candy spoon for her.

Aunties: There is a really cool versatile shirt called the Bina that I found online that I want. So I thought I would make one for my sisters (and myself). Much less than to spend $50 each...

Family from Kids: Key-chains from clay. Stamped and painted. I also want them to make me a couple charms for a personal necklace for myself. This should be a fun project to do with them!

Neighbors and Friends: I will make a batch of my mocha cappuccino mix to put in a pretty container with marshmallows tied with a bag of popcorn and chocolate dipped spoons for a cozy movie night. Much easier than making a fresh batch of cinnamon bread and apple butter like I did last year...

As you can tell from my list, I have a bit of an ADD problem starting a million projects at once (and this is ONLY holiday related!).
What homemade gifts are you making this season?

Monday, November 12, 2012

Tis the season for Punpkins


This is a first for me.  I never really thought about making my own pumpkin puree until I saw the cute, little pie pumpkins at Trader Joe's. I ended up getting a few more pumpkins from Freecycle (yea!) and so made a giant batch of 7 pie pumpkins. Ambitious… I realized this about half way through the process.

Even though this is my first pumpkin cooking journey, I figured it was worth writing about and I have no idea when I will do this again. 


Before I heated the oven I did my research. There are a few ways to get the good stuff. You can cut it up and stick it in the oven. You can chop it up and toss it into a slow cooker. Or you can do what I did… simply deposit the pumpkins into the oven.
Before
After
The simple way, or so it seemed. I coated the pumpkins with coconut oil and put them in there at 400 degrees. It took a little over an hour but then they cut like butter and the seeds just fell out with only a little scraping.

I set up with the cutting board area. A little bowl for the seeds (planning on roasting them later) and a huge bowl for the flesh of the pumpkins. Separating the seeds from the hot stringy goop was the part that took a long time and made quite a mess. Every time I had to stop I had to scrub my whole arms.

I noticed that the smaller the pumpkin, the more seeds and water there was.

When I was done cutting up the pumpkins I looked online again. I noticed that each website I came across used either a blender or a food processor to puree the stuff. What a mess! I decided to use my immersion blender. Much easier I think.

Looking at the puree, I decided that I needed to strain the orange puree. I know you can use a paper towel, but I just happen to have had some new cheesecloth. I rigged up a bowl with a large colander (I rarely use this but it sure comes in handy to have!) containing the cheesecloth. Once I had the pumpkin inside, I covered it with foil and stuck it in the refrigerator overnight.
In the Fridge on top of my batch of Granola Bars

Please note that I started this process at 3pm Sunday with a brief pause for dinner and putting kids in the shower and bed, I finally stuck the puree in the refrigerator at 8pm.

I picked this up again the next day. 

I took the juice and saved it in a jar. I ended up using some of it in place of water in a batch of pancakes. No need to let the nutrition go to waste...
Check out all this juice!


I started portioning out the pumpkin for freezing. I find it very interesting that pumpkin cannot be home canned...

Plus extra for pie!
Double bagged for the freezer.
 My husband saw what I was doing and asked for pumpkin pie… so I ended up with 6 portions to freeze and 2 pumpkin pies (that were really good! And surprisingly easy to make).

One pie did not last long. I mixed a couple recipes that I found on allrecipes with one I found from Paula Dean. It is a really good thing I made the other one to freeze for latter!

Have you ever experimented with pumpkins?

Shared with DIY Home, Monday Mania, Recipe Exchange, Frugally Sustainable, Should be MoppingCheerios and Lattes and Mostly Homemade.

Monday, November 5, 2012

Better than Quaker

I did a lot of cooking in my kitchen this weekend. I made bread, bread mixes, chocolate syrup, cappuccino mix, pumpkin puree (coming soon!) and granola bars. Now I’m tired…

I posted a picture on facebook a couple weeks ago of some beautiful granola bars. I made those without peanuts and we went right through them. This time I made 1 batch with no nuts (so my daughter could take them to school) and a double batch with nuts.

Why make them from scratch when you can buy them?
My main reason... do you know what is in these things?! food dyes and preservatives just don't sound that appetizing to me. And it is surprisingly easy to do. Has anyone else noticed that the staples that need to be in your pantry are really simple to put together yourself... but I regress.

I am positively in love with homemade granola bars! They are so easy and practically impossible to mess up. Just throw everything you have together in a bowl and add the sugar to hold it together. I originally gathered a couple recipes together to figure out what I liked to do and how. They are all really similar, but some require cooking in an oven while some don’t. Here is the recipe that I have adjusted to use the most:

Thick & Chewy Granola Bars – no bake

1 2/3 cups quick rolled oats 
1/2 to 3/4 cup brown sugar (use less if using Peanut Butter)
1/3 cup almond flour or oat flour (put almonds/oats in blender until you get a powder)
1 1/4 teaspoon ground cinnamon
3 cups miscellaneous stuff (i.e. I like to add cranberries, raisins, coconut flakes, sunflower seeds, nuts, flax seeds, chai seeds, rice cereal and whatever else I have on hand)
1/3 cup peanut butter or other nut butter (if you don't want any nut butter, increase the sugar. But I like to add sunflower seed butter to my no-nut version)
1 teaspoon vanilla extract
1/4 cup coconut oil
1/4 cup honey
1/4 cup mini chocolate chips

1.    Stir dry ingredients in large bowl. Everything except the chocolate chips.
I like to put the seeds in the blender to
disguise them from the kids.

2.       Melt oil, honey, nut butter, and sugar until bubbly, for no more than two minutes.  Stir constantly. Let mixture cool for 2-3 minutes, then add vanilla and stir.

3.       Pour liquid mixture over dry mixture and stir thoroughly so that the oats and cereal are all coated.

After it is well mixed, I like to let it cool a moment before adding mini chocolate chips. They will melt a little, but I find that it is better to mix the chocolate together with the mix rather than add it to the top before pressing to avoid a melted chocolate mess on top.
4.       Pour mixture into pan. Press down to pack it all down good.

I like to put foil or plastic wrap in the pan so I don’t have to grease it and run the risk of bars coming apart when I am trying to take them out of the pan. I also use a piece of plastic wrap to press the granola down so I don’t have to get my hands dirty.

5.       Place granola bars in refrigerator until set. Then you can cut them. 
can you see my cut marks in the No-Nut version?
I like to make bars, but you can make squares or triangles if you like.
In this picture you can see the Nut version.
I took the foil/bars out of the container to cut
them and put them in ziplock bags.
6.       Store in the fridge or at room temperature. I like to put them in ziplock bags for easy kid snacks and store them in a Tupperware for easy kid access. I am also thinking that they save a little longer this way since I have noticed that they save 3 weeks with no problems.
You can see my beautiful labels. "NN" for No Nuts.
It might seem like a huge waste of baggies, but these bags are easily cleaned and reused. I have gotten in the habit of turning baggies inside out to wash with soap and water before letting air dry when the only thing inside them are silly things like granola or raisins or crackers or... you get the idea.

If you haven't tried this before. Take a couple minutes to whip up a batch!

Shared at Recipe Exchange, Homemade Monday, Mop it Monday, Homemade Monday, Monday Mania DIY Home Sweet HomeCheerios & Lattes, Saturday Seven and Frugally Sustainable.